Thursday, March 30, 2017
Monday, March 27, 2017
Android FCM what is notification message and data message?
To send notification messages, set the notification key with the necessary predefined set of key options for the user-visible part of the notification message. For example, here is a JSON-formatted notification message in an IM app. The user can expect to see a message with the title "Portugal vs. Denmark" and text "great match!" on the device:
{
"to" : "bk3RNwTe3H0:CI2k_HHwgIpoDKCIZvvDMExUdFQ3P1...",
"notification" : {
"body" : "great match!",
"title" : "Portugal vs. Denmark",
"icon" : "myicon"
}
}
Notification messages are delivered to the notification tray when the app is in the background. For apps in the foreground, messages are handled by these callbacks:
didReceiveRemoteNotification: on iOS
onMessageReceived() on Android. The notification key in the data bundle contains the notification.
See notification payload support for the full list of predefined keys available for building notification messages.
Data messages
Set the data key with your custom key-value pairs to send a data payload to the client app. Data messages can have a 4KB maximum payload.
For example, here is a JSON-formatted message in the same IM app as above, where the information is encapsulated in the data key and the client app is expected to interpret the content:
{
"to" : "bk3RNwTe3H0:CI2k_HHwgIpoDKCIZvvDMExUdFQ3P1...",
"data" : {
"Nick" : "Mario",
"body" : "great match!",
"Room" : "PortugalVSDenmark"
},
}
On iOS, FCM stores the message and delivers it only when the app is in the foreground and has established a FCM connection. On Android, a client app receives a data message in onMessageReceived() and can handle the key-value pairs accordingly.
Note these further platform-specific details:
On Android, the data payload can be retrieved in the Intent used to launch your activity.
On iOS, the data payload is found in didReceiveRemoteNotification:.
{
"to" : "bk3RNwTe3H0:CI2k_HHwgIpoDKCIZvvDMExUdFQ3P1...",
"notification" : {
"body" : "great match!",
"title" : "Portugal vs. Denmark",
"icon" : "myicon"
}
}
Notification messages are delivered to the notification tray when the app is in the background. For apps in the foreground, messages are handled by these callbacks:
didReceiveRemoteNotification: on iOS
onMessageReceived() on Android. The notification key in the data bundle contains the notification.
See notification payload support for the full list of predefined keys available for building notification messages.
Data messages
Set the data key with your custom key-value pairs to send a data payload to the client app. Data messages can have a 4KB maximum payload.
For example, here is a JSON-formatted message in the same IM app as above, where the information is encapsulated in the data key and the client app is expected to interpret the content:
{
"to" : "bk3RNwTe3H0:CI2k_HHwgIpoDKCIZvvDMExUdFQ3P1...",
"data" : {
"Nick" : "Mario",
"body" : "great match!",
"Room" : "PortugalVSDenmark"
},
}
On iOS, FCM stores the message and delivers it only when the app is in the foreground and has established a FCM connection. On Android, a client app receives a data message in onMessageReceived() and can handle the key-value pairs accordingly.
Note these further platform-specific details:
On Android, the data payload can be retrieved in the Intent used to launch your activity.
On iOS, the data payload is found in didReceiveRemoteNotification:.
AMR Compilation on Linphone - Which all files getting compiled?
Linphone AMR NB compilation, which files are getting built along as we compile the library?
Well, here are they ... We can see in the build log that is generated.
0%] codecs/amrnb/amrnb/wrapper.cpp.o
[ 1%] codecs/amrnb/opencore/codecs_v2/audio/gsm_amr/amr_nb/common/src/add.cpp.o
[ 1%] codecs/amrnb/opencore/codecs_v2/audio/gsm_amr/amr_nb/common/src/az_lsp.cpp.o
[ 2%] codecs/amrnb/opencore/codecs_v2/audio/gsm_amr/amr_nb/common/src/bitno_tab.cpp.o
[ 3%] codecs/amrnb/opencore/codecs_v2/audio/gsm_amr/amr_nb/common/src/bitreorder_tab.cpp.o
[ 3%] codecs/amrnb/opencore/codecs_v2/audio/gsm_amr/amr_nb/common/src/c2_9pf_tab.cpp.o
--
---
--
---
[100%] Linking CXX static library libopencore-amrnb.a
Friday, March 24, 2017
AMR vs Opus & AAC
The AMR-WB (AMR Wideband) codec is the de facto standard for HD voice in the cellular arena. It has been turned up in over 50 3G networks (and growing) and is the standard codec for Voice over LTE (VoLTE). However, onerous licensing issues for software developers are limiting its proliferation beyond cell phones and mobile networks, opening the way for the open-source Opus codec and Fraunhofer's "Full HD voice" AAC codec.
Patents for AMR-WB are held by Ericsson, France Telecom/Orange Nokia and VoiceAge. A patent pool -- basically, a one-stop place to license the patents -- for AMR-WB device usage was announced in 2009. Managed by VoiceAge, the licensing is designed for application to consumer devices -- basically phones and tablets.
Software developers, on the other hand, have to negotiate with each of the individual patent holders. I've heard from two companies -- one that makes soft clients, the other core network server functions -- who went through the process. Both told the same story: Each patent holder has a different set of terms, conditions, and pricing. That's four different contracts, unlike the one-stop patent pool VoiceAge runs for device manufacturers.
Opus has become all the rage among the developer community and early adopters, driven by its incorporation into the browser for WebRTC. It's open source, royalty free, you use it, and it supports everything from narrowband voice in limited bandwidth conditions to streaming music at 510 kbps with sampling rates between 8 kHz to 48 kHz. Since you can find WebRTC in Google's Chrome and Mozilla's Firefox browser, you can get a high-quality audio experience by just pulling up a Web page.
Among the services and companies that have vowed support for Opus are CounterPath and TruPhone. CounterPath is the largest commercial soft client shop around while TruPhone will join Line2 in adding Opus support for its service/apps when it comes to client-to-client communications.
Compare AMR-WB to Opus or the royalty-enabled Fraunhofer AAC codecs and it becomes a grim contest. Opus and AAC both provide a wider and more flexible range of uses, with either simplifying implementation of sound playback to a single codec set capable of delivering everything from narrowband voice to high quality streaming music. Opus is royalty-free while you typically end up getting AAC thrown into/onto mobile devices via versions of Android and Apple iOS.
AMR-WB has two attributes going for it at this time: Bandwidth and CPU usage/battery life. A full blown AMR-WB call uses 24 kbps. Opus uses less bandwidth in the wideband mode, but has the potential of running up to 128 kbps for so-called "full band" stereo usage. Service providers would no doubt like to have the option to throttle bandwidth usage in certain use cases.
Battery life becomes the most interesting question. Since Opus is a software-based codec, processing takes place using RAM and CPU time, thereby placing more power demands on the battery. But since nobody has (yet) run a side-by-side power comparison between an Opus call of one minute and 10 minutes to an AMR-WB call, it isn't clear how much of a power hit takes place. AMR-WB advocates would argue that on a performance-per-watt basis, its codec would beat Opus and AAC. In the real world, with plenty of people already opting to use Skype and Apple Facetime videoconferencing, the arguments for AMR-WB power efficiency might be academic rather than user driven. Apply Moore's Law for continued performance-per-watt efficiency and potentially some silicon tinkering/optimization for Opus usage and the argument continues to diminish.
references:
http://www.webrtcworld.com/topics/webrtc-world/articles/339560-amr-wb-its-future-hd-voice.htm
Patents for AMR-WB are held by Ericsson, France Telecom/Orange Nokia and VoiceAge. A patent pool -- basically, a one-stop place to license the patents -- for AMR-WB device usage was announced in 2009. Managed by VoiceAge, the licensing is designed for application to consumer devices -- basically phones and tablets.
Software developers, on the other hand, have to negotiate with each of the individual patent holders. I've heard from two companies -- one that makes soft clients, the other core network server functions -- who went through the process. Both told the same story: Each patent holder has a different set of terms, conditions, and pricing. That's four different contracts, unlike the one-stop patent pool VoiceAge runs for device manufacturers.
Opus has become all the rage among the developer community and early adopters, driven by its incorporation into the browser for WebRTC. It's open source, royalty free, you use it, and it supports everything from narrowband voice in limited bandwidth conditions to streaming music at 510 kbps with sampling rates between 8 kHz to 48 kHz. Since you can find WebRTC in Google's Chrome and Mozilla's Firefox browser, you can get a high-quality audio experience by just pulling up a Web page.
Among the services and companies that have vowed support for Opus are CounterPath and TruPhone. CounterPath is the largest commercial soft client shop around while TruPhone will join Line2 in adding Opus support for its service/apps when it comes to client-to-client communications.
Compare AMR-WB to Opus or the royalty-enabled Fraunhofer AAC codecs and it becomes a grim contest. Opus and AAC both provide a wider and more flexible range of uses, with either simplifying implementation of sound playback to a single codec set capable of delivering everything from narrowband voice to high quality streaming music. Opus is royalty-free while you typically end up getting AAC thrown into/onto mobile devices via versions of Android and Apple iOS.
AMR-WB has two attributes going for it at this time: Bandwidth and CPU usage/battery life. A full blown AMR-WB call uses 24 kbps. Opus uses less bandwidth in the wideband mode, but has the potential of running up to 128 kbps for so-called "full band" stereo usage. Service providers would no doubt like to have the option to throttle bandwidth usage in certain use cases.
Battery life becomes the most interesting question. Since Opus is a software-based codec, processing takes place using RAM and CPU time, thereby placing more power demands on the battery. But since nobody has (yet) run a side-by-side power comparison between an Opus call of one minute and 10 minutes to an AMR-WB call, it isn't clear how much of a power hit takes place. AMR-WB advocates would argue that on a performance-per-watt basis, its codec would beat Opus and AAC. In the real world, with plenty of people already opting to use Skype and Apple Facetime videoconferencing, the arguments for AMR-WB power efficiency might be academic rather than user driven. Apply
references:
http://www.webrtcworld.com/topics/webrtc-world/articles/339560-amr-wb-its-future-hd-voice.htm
for VoLTE is AMRWB required?
AMR-WB is specified by 3GPP as the mandatory codec to be supported by wideband mobile terminals for a wide range of communication services. This is mentioned here.https://tools.ietf.org/html/draft-marjou-rtcweb-audio-codecs-for-interop-01#ref-AMR-WB
This includes the massively deployed circuit switched mobile telephony services and new multimedia telephony services over IP/IMS and 4G/VoLTE as specified by GSMA as voice IMS profile for VoLTE in IR92. Hence, AMR-WB is strongly increasing with deployment in more than 60 networks from 45 countries and more than 130 types of terminals. In that use case, if OPUS and G.711 remain the only codecs supported by the WebRTC endpoints, a gateway must then transcode these codecs into AMR-WB, and vice-versa, in order to implement the use-case. As a consequence, a high number of calls are likely to be affected by transcoding operations producing a degradation of the user quality experience for many customers. This will have a very significant business impact for all service providers on both sides, not only with respect to the transcoding costs but mainly with respect to user experience degradation.
The drawbacks of transcoding are recalled below:
Cost issues: transcoding places important additional costs on network gateways for example codec implementation and license costs, deployments costs, testing/validation costs etc... However these costs can be seen as just transferred from the terminal side to the network side. The real issue is rather the degradation of the quality of service affecting the end user perceived quality which will be harmful to all concerned service providers.
Intrinsic quality degradation: Subjective test results show that intrinsic voice quality is significantly degraded by transcoding. The degradation is around 0.2 to 0.3 MOS for most of transcoding use cases with AMR-WB at 12.65 kbit/s. It should be stressed that if transcoding is performed between AMR-WB and G.711, wideband voice quality will be lost. Such bandwidth reduction effect clearly degrades the user perceived quality of service leading to shorter and less frequent calls (see ref_gsma). Such a switch to G.711 will not be accepted anymore by customers. If transcoding is performed between AMR-WB and OPUS, wideband communication could be maintained. However, as the WB codecs complexity is higher than NB codecs complexity, such WB transcoding is also more costly and degrades the quality: MOS scores of transcoding between AMR-WB 12.65kbit/s and OPUS at 16 kbit/s in both directions are significantly lower than those of AMR-WB at 12.65kbit/s or OPUS at 16 kbit/s. Furthermore, in degraded conditions, the addition of defects, like audio artifacts due to packet losses, and the audio effects resulting from the cascading of different packet loss recovery algorithms may result in a quality below the acceptable limit for the customers.
Degraded interactivity due to increased latency: Transcoding means full de-packetization for decoding of the media stream (including mechanisms of de-jitter buffering and packet loss recovery) then re-encoding, re-packetization and re-sending. The delays produced by all these operations are additive and may increase the end to end delay beyond acceptable limits like with more than 1s end to end latency.
As a consequence, re-using AMR-WB would be beneficial for the specific usage of WebRTC technology over mobile networks. With the strong increase of the smartphone market the capability to use such a mobile codec could strongly enforce and extend the market penetration of the Web RTC technology.
references:
https://tools.ietf.org/html/draft-marjou-rtcweb-audio-codecs-for-interop-01#section-4.1
What is CAT-iq?
Cordless Advanced Technology—internet and quality (CAT-iq) is a technology initiative from the Digital Enhanced Cordless Telecommunications (DECT) Forum, based on ETSI TS 102 527 New Generation DECT (NG-DECT) European standard series.
NG-DECT contains backward compatible extensions to basic DECT GAP functionality which allow bases and handsets from different vendors to work together with full feature richness expected from SIP terminals and VoIP gateways.
CAT-iq defines several profiles for high quality wideband voice services with multiple lines, as well as low bit-rate data applications.
The CAT-iq profiles are split between voice and data service, with the following mandatory features: [1]
CAT-iq 1.0 - "HD Voice" (ETSI TS 102 527-1): narrow-band (32 kbit/s G.726 ADPCM) and wideband (64 kbit/s G.722 sub-band ADPCM) audio, calling party line and name identification (CLIP, CNIP)
CAT-iq 2.0 - "Multi Line" (ETSI TS 102 527-3): adds multiple lines, line name/id, call waiting, call transfer, phonebook, missed calls list, DTMF signalling, hands-free headset, handset locator, synchronisation of call lists, phonebook, and settings
CAT-iq 2.1 - "Green" (ETSI TS 102 527-5): adds 3-party conference, call intrusion, caller blocking (CLIR), answering machine control, SMS on handsets, power-saving modes for handset and base
CAT-iq 3.0 - "Internet Ready" (ETSI TS 102 527-4): light data services, software upgrade over the air (SUOTA)
CAT-iq 4.0 - "Intelligent Networking" (planned): Smart Home connectivity (IOT) using DECT Ultra Low Energy (ETSI TS 102 939)
The CAT-iq profiles require a stricter set of mandatory features than the relevant ETSI NG-DECT standards, which make many advanced features optional.
Optional voice codecs include 64 kbit/s G.711 µ-law/A-law PCM (narrow band), 32 kbit/s G.729.1 (wideband), 32 kbit/s MPEG-4 ER AAC-LD (wideband), and 64 kbit/s MPEG-4 ER AAC-LD (super-wideband).
Within the voice profiles, the revisions are sequential: CAT-iq 1.0 provides basic wideband voice, while CAT-iq 2.0 and 2.1 add new functions which expand and supersede parts of the lower profiles.
The data profiles CAT-iq 3.0 and 4.0 can either be considered in isolation for data only devices or as a complementary service to the voice enabled devices.
references:
https://en.wikipedia.org/wiki/CAT-iq
Thursday, March 23, 2017
Swift 3.0 How to make CGColorRef from UIColor
This is pretty easy. For e.g
button.layer.borderColor = UIColor.white.cgColor
button.layer.borderColor = UIColor.white.cgColor
Mac how to print the list of files in to a file easily
If we have to create a list of files with path in Mac, its easy, Just follow these steps
1. Open a text Edit and make it as plain formatted
2. Select the folder contents and drag on to the text edit
thats it!


references:
https://www.macobserver.com/tmo/article/mac_os_x_print_or_save_a_list_of_file_names
1. Open a text Edit and make it as plain formatted
2. Select the folder contents and drag on to the text edit
thats it!


references:
https://www.macobserver.com/tmo/article/mac_os_x_print_or_save_a_list_of_file_names
Monday, March 20, 2017
Swift 3.0 - PageView Controller
The tutorial given in the reference link is awesome one. Few notes mainly are
references:
https://spin.atomicobject.com/2015/12/23/swift-uipageviewcontroller-tutorial/
class TutorialPageViewController: UIPageViewController {
private(set) lazy var orderedViewControllers: [UIViewController] = {
return [self.newColoredViewController("Green"),
self.newColoredViewController("Red"),
self.newColoredViewController("Blue")]
}()
private func newColoredViewController(color: String) -> UIViewController {
return UIStoryboard(name: "Main", bundle: nil) .
instantiateViewControllerWithIdentifier("\(color)ViewController")
}
override func viewDidLoad() {
super.viewDidLoad()
dataSource = self
if let firstViewController = orderedViewControllers.first {
setViewControllers([firstViewController],
direction: .Forward,
animated: true,
completion: nil)
}
}
}
Have the below two methods as delegates
func pageViewController(pageViewController: UIPageViewController,
viewControllerBeforeViewController viewController: UIViewController) -> UIViewController? {
guard let viewControllerIndex = orderedViewControllers.indexOf(viewController) else {
return nil
}
let previousIndex = viewControllerIndex - 1
guard previousIndex >= 0 else {
return nil
}
guard orderedViewControllers.count > previousIndex else {
return nil
}
return orderedViewControllers[previousIndex]
}
func pageViewController(pageViewController: UIPageViewController,
viewControllerAfterViewController viewController: UIViewController) -> UIViewController? {
guard let viewControllerIndex = orderedViewControllers.indexOf(viewController) else {
return nil
}
let nextIndex = viewControllerIndex + 1
let orderedViewControllersCount = orderedViewControllers.count
guard orderedViewControllersCount != nextIndex else {
return nil
}
guard orderedViewControllersCount > nextIndex else {
return nil
}
return orderedViewControllers[nextIndex]
}
references:
https://spin.atomicobject.com/2015/12/23/swift-uipageviewcontroller-tutorial/
Tuesday, March 14, 2017
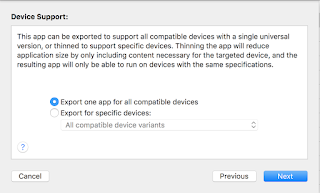
iOS how to test App Thinning?
Beginning iOS 9.0 Apple introduced App Thinning concept by which Application can download only the assets or binary required for the target device in which app being downloaded. Normally when application is submitted, it will be full bundle and binary, and while download the necessary items are downloaded. Now, how to test this?
Below given steps for it,
1. Product -> Archive - > Shows the organizer window with the recently archived list
2. Press on Export seen on the right side panel. (need to have the team credentials added to the Xcode preferences and select the team used for signing)
3. on the window that comes up, select Export for Specific device and select the device model to which the app to be targeted. This generates the ipa for only that device.
references
Below given steps for it,
1. Product -> Archive - > Shows the organizer window with the recently archived list
2. Press on Export seen on the right side panel. (need to have the team credentials added to the Xcode preferences and select the team used for signing)
3. on the window that comes up, select Export for Specific device and select the device model to which the app to be targeted. This generates the ipa for only that device.

references
Thursday, March 9, 2017
Symbolicatecrash path in Xcode 8.x
symbolicate crash used to be at this location in Xcode 7.
Now its at this path
/Xcode.app/Contents/SharedFrameworks/DTDeviceKitBase.framework/Versions/A/Resources/symbolicatecrash
Now its at this path
Xcode.app/Contents/SharedFrameworks/DVTFoundation.framework/Versions/A/Resources/symbolicatecrash
With Xcode 8.0 setting developer directory did not work straight away. Below had to be done
With Xcode 8.0 setting developer directory did not work straight away. Below had to be done
sudo /usr/bin/xcode-select -switch /Applications/Xcode.app/Contents/Developer/
export DEVELOPER_DIR=/Applications/Xcode.app
Wednesday, March 8, 2017
Git handle reverting to server commits
Git don’t allow us to merge with local modifications. Git protects from losing potentially important changes.
There are 3 options
1. commit the changes using
git commit -m “my changes that needs a commit and should not be reverted“
2. Stashing
Stashing acts as a stack, where you can push changes, and you pop them in reverse order.
To stash type:
git stash
Do the merge, and then pull the stash:
git stash pop
for e.g.
git stash
git pull (or) switch branch
git stash apply --index
3. Discard the local changes
using git reset --hard. or git checkout -t -f remote/branch
Discard local changes for a specific file
git checkout filename
references:
http://stackoverflow.com/questions/15745045/how-do-i-resolve-git-saying-commit-your-changes-or-stash-them-before-you-can-me
There are 3 options
1. commit the changes using
git commit -m “my changes that needs a commit and should not be reverted“
2. Stashing
Stashing acts as a stack, where you can push changes, and you pop them in reverse order.
To stash type:
git stash
Do the merge, and then pull the stash:
git stash pop
for e.g.
git stash
git pull
git stash apply --index
3. Discard the local changes
using git reset --hard. or git checkout -t -f remote/branch
Discard local changes for a specific file
git checkout filename
references:
http://stackoverflow.com/questions/15745045/how-do-i-resolve-git-saying-commit-your-changes-or-stash-them-before-you-can-me
Tuesday, March 7, 2017
Enabling AMR WB Codec in Linphone
AMRWB codec is by default disabled in linphone as these are not free codecs. AMRWB widely used libraries are opencoreamr (for decoding) and Vo amr (for encode). Below given the steps to enable the AMRWB in the build process.
./prepare.py --debug -DENABLE_NON_FREE_CODECS=ON -DENABLE_AMRWB=OFF&& make
this command forces the non free codec AMRWB to be included in the build process. Once the prepare.py command start execution, it can be noted like below in the build console.
[ 50%] Completed 'EP_ms2'
[ 52%] Built target EP_ms2
[ 52%] Forcing build for 'EP_opencoreamr'
[ 53%] Performing build step for 'EP_opencoreamr'
[ 41%] Built target opencore-amrwb
[100%] Built target opencore-amrnb
[ 54%] Performing install step for 'EP_opencoreamr'
[ 41%] Built target opencore-amrwb
[100%] Built target opencore-amrnb
Install the project...
-- Install configuration: "Debug"
-- Installing: /Users/rr/linphone-iphone/liblinphone-sdk/arm64-apple-darwin.ios/lib/libopencore-amrnb.a
-- Installing: /Users/rr/linphone-iphone/liblinphone-sdk/arm64-apple-darwin.ios/lib/libopencore-amrwb.a
[ 54%] Completed 'EP_opencoreamr'
[ 56%] Built target EP_opencoreamr
[ 56%] Performing configure step for 'EP_voamrwbenc'
loading initial cache file /Users/rr/linphone-iphone/WORK/ios-arm64//tmp/EP_voamrwbenc/EP_voamrwbenc-cache-Debug.cmake
-- Using sysroot path: /Users/rr/Downloads/Xcode.app/Contents/Developer/Platforms/iPhoneOS.platform/Developer/SDKs/iPhoneOS10.2.sdk
-- Using sdk version: 10.2
-- Configuring done
-- Generating done
-- Build files have been written to: /Users/rr/linphone-iphone/WORK/ios-arm64/Build/voamrwbenc
[ 56%] Forcing build for 'EP_voamrwbenc'
[ 57%] Performing build step for 'EP_voamrwbenc'
[100%] Built target vo-amrwbenc
[ 57%] Performing install step for 'EP_voamrwbenc'
[100%] Built target vo-amrwbenc
Install the project...
-- Install configuration: "Debug"
[ 58%] Completed 'EP_voamrwbenc'
[ 60%] Built target EP_voamrwbenc
[ 61%] Performing configure step for 'EP_msamr'
loading initial cache file /Users/rr/linphone-iphone/WORK/ios-arm64//tmp/EP_msamr/EP_msamr-cache-Debug.cmake
-- Using sysroot path: /Users/rr/Downloads/Xcode.app/Contents/Developer/Platforms/iPhoneOS.platform/Developer/SDKs/iPhoneOS10.2.sdk
-- Using sdk version: 10.2
-- Setting install rpath to /Users/rr/linphone-iphone/liblinphone-sdk/arm64-apple-darwin.ios/lib
-- Configuring done
-- Generating done
-- Build files have been written to: /Users/rr/linphone-iphone/WORK/ios-arm64/Build/msamr
[ 62%] Forcing build for 'EP_msamr'
[ 62%] Performing build step for 'EP_msamr'
Scanning dependencies of target msamr-static
[ 33%] Building C object src/CMakeFiles/msamr-static.dir/amrwb.c.o
[ 66%] Linking C static library libmsamr.a
[100%] Built target msamr-static
[ 62%] Performing install step for 'EP_msamr'
[100%] Built target msamr-static
Install the project...
-- Install configuration: "Debug"
-- Installing: /Users/rr/linphone-iphone/liblinphone-sdk/arm64-apple-darwin.ios/lib/mediastreamer/plugins/libmsamr.a
[ 63%] Completed 'EP_msamr'
[ 65%] Built target EP_msamr
In the above process, it builds the opencore AMR decoder and VO AME encoder. Also the media streamer plugin for the AMR is built.
the final library feels can be found under liblinphone-sdk
[x86_64 arm64 armv7] Mixing libopencore-amrnb.a in liblinphone-sdk/apple-darwin/lib/libopencore-amrnb.a
[x86_64 arm64 armv7] Mixing libopencore-amrwb.a in liblinphone-sdk/apple-darwin/lib/libopencore-amrwb.a
[x86_64 arm64 armv7] Mixing libmsamr.a in liblinphone-sdk/apple-darwin/lib/mediastreamer/plugins/libmsamr.a
Great, thats it, it is built.
references:
http://linphone.org/
What if Chromium download fails?
Running client sync itself gives this warning.
+---------------------------------------------------------------------+
| NOTICE: This sync of Chromium will take a long time as several |
| gigabytes of data are downloaded. If this is your initial |
| sync and it's interrupted, try running 'gclient sync' again.|
| If that fails, wipe everything clean and start over again. |
+---------------------------------------------------------------------+
Running "gclient sync --force --revision src@316b880c55452eb694a27ba4d1aa9e74ec9ef342 -v --gclientfile .gclient.tmp --delete_unversioned_trees --reset --upstream --deps=mac,ios,mac" in /Users/rr/WebRTC/one/WebRTC/src/chromium
Looking for .gclient.tmp starting from /Users/rr/WebRTC/one/WebRTC/src/chromium
Loaded .gclient config in /Users/rr/Desktop/WebRTC/WebRTC/src/chromium:
solutions = [{
'name': 'src',
'url': 'https://chromium.googlesource.com/chromium/src.git',
'deps_file': '.DEPS.git',
'managed': False,
'custom_deps': {
# Skip syncing some large dependencies WebRTC will never need.
'src/chrome/tools/test/reference_build/chrome_linux': None,
'src/chrome/tools/test/reference_build/chrome_mac': None,
'src/chrome/tools/test/reference_build/chrome_win': None,
'src/native_client': None,
'src/third_party/cld_2/src': None,
'src/third_party/hunspell_dictionaries': None,
'src/third_party/liblouis/src': None,
'src/third_party/pdfium': None,
'src/third_party/skia': None,
'src/third_party/trace-viewer': None,
'src/third_party/webrtc': None,
},
'safesync_url': ''
}]
+---------------------------------------------------------------------+
| NOTICE: This sync of Chromium will take a long time as several |
| gigabytes of data are downloaded. If this is your initial |
| sync and it's interrupted, try running 'gclient sync' again.|
| If that fails, wipe everything clean and start over again. |
+---------------------------------------------------------------------+
Running "gclient sync --force --revision src@316b880c55452eb694a27ba4d1aa9e74ec9ef342 -v --gclientfile .gclient.tmp --delete_unversioned_trees --reset --upstream --deps=mac,ios,mac" in /Users/rr/WebRTC/one/WebRTC/src/chromium
Looking for .gclient.tmp starting from /Users/rr/WebRTC/one/WebRTC/src/chromium
Loaded .gclient config in /Users/rr/Desktop/WebRTC/WebRTC/src/chromium:
solutions = [{
'name': 'src',
'url': 'https://chromium.googlesource.com/chromium/src.git',
'deps_file': '.DEPS.git',
'managed': False,
'custom_deps': {
# Skip syncing some large dependencies WebRTC will never need.
'src/chrome/tools/test/reference_build/chrome_linux': None,
'src/chrome/tools/test/reference_build/chrome_mac': None,
'src/chrome/tools/test/reference_build/chrome_win': None,
'src/native_client': None,
'src/third_party/cld_2/src': None,
'src/third_party/hunspell_dictionaries': None,
'src/third_party/liblouis/src': None,
'src/third_party/pdfium': None,
'src/third_party/skia': None,
'src/third_party/trace-viewer': None,
'src/third_party/webrtc': None,
},
'safesync_url': ''
}]
Monday, March 6, 2017
The three magical steps building Unix based distribution
With all credits to the original writer of the blog, this blog is just a summary of my understanding. The original blog link can be found at the reference section in this blog.
Whenever a Unix based distribution is built, it follows the standard three step procedure, which is below.
./configure
make
make install
There are three distinct steps in this process:
1. Configure the software
The configure script is responsible for getting ready to build the software on your specific system. It makes sure all of the dependencies for the rest of the build and install process are available, and finds out whatever it needs to know to use those dependencies.
Unix programs are often written in C, so we’ll usually need a C compiler to build them. In these cases the configure script will establish that your system does indeed have a C compiler, and find out what it’s called and where to find it.
2. Build the software
Once configure has done its job, we can invoke make to build the software. This runs a series of tasks defined in a Makefile to build the finished program from its source code.
The tarball you download usually doesn’t include a finished Makefile. Instead it comes with a template called Makefile.in and the configure script produces a customised Makefile specific to your system.
3. Install the software
Now that the software is built and ready to run, the files can be copied to their final destinations. The make install command will copy the built program, and its libraries and documentation, to the correct locations.
This usually means that the program’s binary will be copied to a directory on your PATH, the program’s manual page will be copied to a directory on your MANPATH, and any other files it depends on will be safely stored in the appropriate place.
Since the install step is also defined in the Makefile, where the software is installed can change based on options passed to the configure script, or things the configure script discovered about your system.
Depending on where the software is being installed, you might need escalated permissions for this step so you can copy files to system directories. Using sudo will often do the trick.
NOTE: Who make these files?
Programs that are built in this way have usually been packaged using a suite of programs collectively referred to as autotools. This suite includes autoconf, automake, and many other programs, all of which work together to make the life of a software maintainer significantly easier. The end user doesn’t see these tools, but they take the pain out of setting up an install process that will run consistently on many different flavours of Unix.
references:
https://robots.thoughtbot.com/the-magic-behind-configure-make-make-install
How Does the build flow in linux look like?
This is a simple elegant diagram i could get from the search.

references
http://stackoverflow.com/questions/10999549/how-do-i-create-a-configure-scriptAMR codec - some number facts.
AMR is a compression format to optimize speech coding consisting of multi-rate narrowband speech codecs. AMR files can be recorded with mobile phones. To accomplish random access or synchronization of audio and video the 3GPP format can be utilized. AMR uses ACELP, DTX, VAD, and CNG to code the 160 20-millisecond samples contained in each frame. AMR files are used for voice recording though the format is usually converted into other files for use and distribution.
AMR is capable of encoding 200-3400 Hz signals from 4.75 to 12.2 kbit/s with quality starting at 7.4 kbit/s. Adopted in 1999 by 3GPP, this method is used by GSM and UMTS, using link adaptation to choose from the 8 different bit rates. AMR optimizes link adaptation with the best codec available in order to be utilized with radio channel and capacity requirements. This is only possible if a good connection is provided to prevent the loss of the audio’s quality.
http://samplephotovideo.com/2015/12/download-amr-adaptive-multi-rate-codec-file/
A look at the GNU build System
This article mentioned in references is an awesome place for getting idea of how the GNU build system works
1. How to build executable from available open source software packages
2. How the whole system works for generating scripts and makefiles, which are the basic infrastructure for building and installing software executables.
Below are the three golden steps in the GNU system to build and install the software
1. ./configure => finds out the local environment, check whether packages required are already installed and if everything OK, then write the make files.
2. make => make build the binary executables
3. sudo make install => make install installs the executable.
Below diagram gives good idea of which are the files and processes involved in the build process.
Below are few more commands that may be useful
make check => this can be given between make and make install and this runs a set of regression tests assuming these were included in the software by the developers
make clean => removes all the files made by make and make check but not the files written by the configure.
make distclean => If the intent was to remove the files written by configure as well as start fresh.
make maintainer-clean => it removes all the files that make distclean removes and also removes the files that developer has automatically generated using the GNU build system.
make uninstall => uninstalls the software
make dist => makes the compressed archive distribution package
make distcheck => makes the distribution, unpacks in a sub directory configures, makes the executables and runs the regression test suites to check if everything is OK.
Now lets see what are the pre-requites for GNU build system.
- the system should have GNU gcc compiler
- GNU make
- GNU m4 macro processor version 1.4.5 or above
- GNU tar programs
- autoconf, automake, libtool
Functions of Autoconf
A GNU package may be distributed as source code and it should be possible to make executable under various Posix like systems. This means a developer will have to write make files for each of the platform adapted to it. This is a gigantic task and the Autoconf tool simplifies it. Autoconf tool generate configure (shell script to create make files) adapted to the system in which it has to run. Autoconf tool takes text files configure.ac (former name, configure.in) The configure.ac contains macros to check a system for features that a software package might use. autoconf invokes the m4 macro processor to generate the configure the script.
Functions of Automake
Automaker is a tool for generating the file Makefile.in from a template file Makefile.am
Functions of Autoheader
auto header program scans the configure.ac and generates the file config.h.in containing info about all the preprocessor macros that need to be defined.
aclocal program creates the file aclocal.m4 containing the macro definitions required by autoconf.
references:
Building Opencore AMR decoder
Download the source distribution from the link http://sourceforge.net/projects/opencore-amr/files/opencore-amr/
(at this writing the version number is 0.1.4)
Extract to the file system and make using the below commands For e.g
./configure --prefix=/Users/retheeshravi/Downloads/opencore-amr-0.1.4/rrbld
make && make install
This builds the libopencore-amrwb.a & libopencore-amrnb.a files inside the /rrbld/lib folder.
To make the AMR test code, need to do the below
Move to the folder below and execute the Make command
/opencore-amr-0.1.4/test/
Make
This produces amr-nb and amr-wb executables.
/amrnb-dec sample_amr.amr sample_wav.wav
the file present at this link seems to be narrowband one.
http://samplephotovideo.com/2015/12/download-amr-adaptive-multi-rate-codec-file/
references:
http://sourceforge.net/projects/opencore-amr/files/opencore-amr/
iOS how to know if Accessiblity Voiceover is running on device
The methods below will give info about whether accessibility is running
func UIAccessibilityIsVoiceOverRunning() -> Bool
You can use this function to customize your application’s UI specifically for VoiceOver users. For example, you might want UI elements that usually disappear quickly to persist onscreen for VoiceOver users. Note that you can also listen for the UIAccessibilityVoiceOverStatusChanged notification to find out when VoiceOver starts and stops, which is below.
[[NSNotificationCenter defaultCenter] addObserver:self
selector:@selector(voiceOverStatusChanged)
name:UIAccessibilityVoiceOverStatusChanged
object:nil];
- (void)voiceOverStatusChanged
{
if(!UIAccessibilityIsVoiceOverRunning())
{
//do your changes
}
}
On Android below API will help on this
AccessibilityManager am = (AccessibilityManager) getSystemService(ACCESSIBILITY_SERVICE);
boolean isAccessibilityEnabled = am.isEnabled();
boolean isExploreByTouchEnabled = am.isTouchExplorationEnabled();
references:
https://developer.apple.com/reference/uikit/1615187-uiaccessibilityisvoiceoverrunnin
What is difference between .cc & .cpp extension?
Historically, the suffix for a C++ source file was .C. This caused a few problems the first time C++ was ported to a system where case wasn't significant in the filename.
Different users adopted different solutions: .cc, .cpp, .cxx and possibly others. Today, outside of the Unix world, it's mostly .cpp. Unix seems to use .cc more often.
For headers, the situation is even more confusing: for whatever reasons, the earliest C++ authors decided not to distinguish between headers for C and for C++, and used .h.
This doesn't cause any problems if there is no C in the project, but when you start having to deal with both, it's usually a good idea to distinguish between the headers which can be used in C (.h) and those which cannot (.hh or .hpp).
In addition, in C++, a lot of users (including myself) prefer keeping the template sources and the inline functions in a separate file. Which, while strictly speaking a header file, tends to get yet another set of conventions (.inl, .tcc and probably a lot of others).
In the case of headers it makes absolutely no difference to the compiler.
In the case of source files different endings will cause the compiler to assume a different language. But this can normally be overridden, and I used .cc with VC++ long before VC++ recognized it as C++.
Sunday, March 5, 2017
What is GN Build System? - Basics
GN is a meta-build system that generates NinjaBuild files so that you can build Chromium with Ninja
Adding a build file
Create a tools/gn/tutorial/BUILD.gn file and enter the following:
executable("hello_world") {
sources = [
"hello_world.cc",
]
}
There should already be a hello_world.cc file in that directory, containing what you expect. That's it! Now we just need to tell the build about this file. Open the BUILD.gn file in the root directory and add the label of this target to the dependencies of one of the root groups (a “group” target is a meta-target that is just a collection of other targets):
group("root") {
deps = [
...
"//url",
"//tools/gn/tutorial:hello_world",
]
}
You can see the label of your target is “//” (indicating the source root), followed by the directory name, a colon, and the target name.
Testing your addition
From the command line in the source root directory:
gn gen out/Default
ninja -C out/Default hello_world
out/Default/hello_world
GN encourages target names for static libraries that aren't globally unique. To build one of these, you can pass the label with no leading “//” to ninja:
ninja -C out/Default tools/gn/tutorial:hello_world
Declaring dependencies
Let's make a static library that has a function to say hello to random people. There is a source file hello.cc in that directory which has a function to do this. Open the tools/gn/tutorial/BUILD.gn file and add the static library to the bottom of the existing file:
static_library("hello") {
sources = [
"hello.cc",
]
}
Now let's add an executable that depends on this library:
executable("say_hello") {
sources = [
"say_hello.cc",
]
deps = [
":hello",
]
}
This executable includes one source file and depends on the previous static library. The static library is referenced by its label in the deps. You could have used the full label //tools/gn/tutorial:hello but if you're referencing a target in the same build file, you can use the shortcut :hello.
Test the static library version
ninja -C out/Default say_hello
out/Default/say_hello
Compiler settings
Our hello library has a new feature, the ability to say hello to two people at once. This feature is controlled by defining TWO_PEOPLE. We can add defines like so:
static_library("hello") {
sources = [
"hello.cc",
]
defines = [
"TWO_PEOPLE",
]
}
Putting settings in a config
However, users of the library also need to know about this define, and putting it in the static library target defines it only for the files there. If somebody else includes hello.h, they won't see the new definition. To see the new definition, everybody will have to define TWO_PEOPLE.
GN has a concept called a “config” which encapsulates settings. Let's create one that defines our preprocessor define:
config("hello_config") {
defines = [
"TWO_PEOPLE",
]
}
To apply these settings to your target, you only need to add the config's label to the list of configs in the target:
static_library("hello") {
...
configs += [
":hello_config",
]
}
Note that you need “+=” here instead of “=” since the build configuration has a default set of configs applied to each target that set up the default build stuff. You want to add to this list rather than overwrite it. To see the default configs, you can use the print function in the build file or the desc command-line subcommand (see below for examples of both).
Dependent configs
This nicely encapsulates our settings, but still requires everybody that uses our library to set the config on themselves. It would be nice if everybody that depends on our hello library can get this automatically. Change your library definition to:
static_library("hello") {
sources = [
"hello.cc",
]
all_dependent_configs = [
":hello_config"
]
}
Add a new build argument
You declare which arguments you accept and specify default values via declare_args.
declare_args() {
enable_teleporter = true
enable_doom_melon = false
}
Don‘t know what’s going on?
You can run GN in verbose mode to see lots of messages about what it's doing. Use -v for this.
Print debugging
There is a print command which just writes to stdout:
static_library("hello") {
...
print(configs)
}
The “desc” command
You can run gn desc to get information about a given target:
gn desc out/Default //tools/gn/tutorial:say_hello
will print out lots of exciting information. You can also print just one section. Lets say you wanted to know where your TWO_PEOPLE define came from on the say_hello target:
> gn desc out/Default //tools/gn/tutorial:say_hello defines --blame
...lots of other stuff omitted...
From //tools/gn/tutorial:hello_config
(Added by //tools/gn/tutorial/BUILD.gn:12)
TWO_PEOPLE
Performance
You can see what took a long time by running it with the --time command line flag. This will output a summary of timings for various things.
You can also make a trace of how the build files were executed:
gn --tracelog=mylog.trace
references:
https://chromium.googlesource.com/chromium/src/tools/gn/
https://chromium.googlesource.com/chromium/src/tools/gn/+/HEAD/docs/quick_start.md#Adding-a-build-file
Friday, March 3, 2017
ATS requirement from Apple
In summary, below is what we need to do in the apps
1. Make every URLs to https
2. Ensure the TLS version is TLS1.2.
3. Have the certificate used in the server to client communication is trusted.
How do we detect if a URL is ATS compliant?
The nscurl tool on OS X El Capitan supports diagnosing ATS secure connections.
For example, /usr/bin/nscurl --ats-diagnostics https://www.example.com will display ATS connection information for www.example.com. Run /usr/bin/nscurl -h for more information.
This tools prints PASS / FAIL information. Ensure PASS results for test with diagnose dictionary with NO exceptions specified.
To view the certificate info of a particular Domain or test out the connection, TLS tool will be a good utility.
https://developer.apple.com/library/content/samplecode/sc1236/Introduction/Intro.html#//apple_ref/doc/uid/DTS40014927-Intro-DontLinkElementID_2
Does it affect Socket communication?
Below is the answer from Apple staff (https://forums.developer.apple.com/thread/48979)
Right now ATS is only enforced by our high-level APIs (NSURLSession, NSURLConnection, and anything layered on top of those), and there’s been no announcements about that changing.
Keep in mind, however, that ATS’s enhanced security requirements are not arbitrary; they are defined to give your users a good level of security on an increasingly hostile Internet. As such, your app should aim to comply with these requirements even if ATS is not actively enforcing them.
https://developer.apple.com/library/content/documentation/General/Reference/InfoPlistKeyReference/Articles/CocoaKeys.html#//apple_ref/doc/uid/TP40009251-SW59
(Section NSAppTransportSecurity)
Thursday, March 2, 2017
Swift how to have a Textfield that is having only bottom border
Below can be written on file say for e.g. UITextFieldExtension
extension UITextField{
func useUnderline() {
self.borderStyle = UITextBorderStyle.none
self.backgroundColor = UIColor.clear
let width = 1.0
let borderLine = UIView()
borderLine.frame = CGRect(x: 0, y: Double(self.frame.height) - width, width: Double(self.frame.width), height: width)
borderLine.backgroundColor = UIColor.lightGray
self.addSubview(borderLine)
}
at the time of calling , it can be called like below
tfSample.useUnderline()
references:
Installing Git LFS
Git Large File Storage (LFS) replaces large files such as audio samples, videos, datasets, and graphics with text pointers inside Git, while storing the file contents on a remote server like GitHub.com or GitHub Enterprise.


Steps are simple
1) Download and install the Git command line extension. You only have to set up Git LFS once.
git lfs install
2) Select the file types you'd like Git LFS to manage (or directly edit your .gitattributes). You can configure additional file extensions at anytime.
git lfs track "*.framework"
3) Make sure .gitattributes is tracked
git add .gitattributes
4) There is no step three. Just commit and push to GitHub as you normally would.
git add file.psd
git commit -m "Add framework file"
git push origin master
One can also do a command line + Source tree approach, in which case, before pushing to server, if open the project in Source Tree, below will be asked to the user.

references:
Wednesday, March 1, 2017
Extensions in Swift 3.0
Extensions add new functionality to an existing class, structure, enumeration, or protocol type. This includes the ability to extend types for which you do not have access to the original source code (known as retroactive modeling). Extensions are similar to categories in Objective-C. (Unlike Objective-C categories, Swift extensions do not have names.)
Below is what we can do with Extensions in Swift
Add computed instance properties and computed type properties
Define instance methods and type methods
Provide new initializers
Define subscripts
Define and use new nested types
Make an existing type conform to a protocol
references:
Subscribe to:
Posts (Atom)